Canvas Basics – 08 Bouncing And Deflecting

This is the eighth post in this series looking at the <canvas> element in HTML5.
Each post will give a new element of snippet of code that can be put together to create your own games.
So far we have displayed text on screen, looked at the mouse’s X and Y co-ordinates on the canvas, moved a shape automatically and moved a shape using the keyboard’s arrow keys and tested when two objects collided.
This is a follow on from the posts looking at maths in games (click here to read the first post).
If you are not already familiar with HTML, you can read through the posts starting here (click to read).
The first 7 posts in this series can be found at:
- Canvas Basics – 01 Hello World
- Canvas Basics – 02 Mouse Detection
- Canvas Basics – 03 Moving An Object
- Canvas Basics – 04 Move An Object Using The Keyboard
- Canvas Basics – 05 Limiting Movement To Canvas
- Canvas Basics – 06 Collision Detection
- Canvas Basics – 07 Random Positions
You can start reading the above links if you have no HTML/Javascript/Canvas experience, or if you have some of the basics covered already, you can continue with this post.
This post is going to show you how to limit the movement of our object to the canvas area.
What you’ll need
For these posts you will need a text editor (Notepad on Windows for example) and a relatively up to date browser (Google Chrome is my preference).
In the screenshots you are about to see, you will see that I am not using Notepad for coding, this is because I am using a different package which allows you to see line numbers, this will make it easier for me to comment on particular lines.
Skeleton
If you are following these posts, you should have a skeleton2.html file from the last post.
If you have not been following these posts, copy the code below to a text editor file and save it as “skeleton2.html”.
You will be changing the .js file reference in line 9 and you can change the page title in line 3 if you wish.
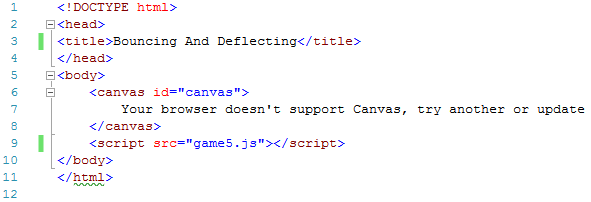
The code for skeleton2.html is:
<!DOCTYPE html>
<head>
<title>Bouncing And Deflecting</title>
</head>
<body>
<canvas id="canvas">
Your browser doesn't support Canvas, try another or update
</canvas>
<script src="game5.js"></script>
</body>
</html>
Save this file.
Going forward, you are going to view the “skeleton2.html” file in your browser, but all the code we are about to create will be entered in the game5.js file in your text editor.
game5.js
In your text editor, open game4.js and save it as game5.js.
If you have not been following these posts, copy the final code from game4.js below into a blank text editor file and save as game5.js.
var canvas = document.getElementById('canvas');
var ctx = canvas.getContext('2d');
canvas.width = 500;
canvas.height = 400;
canvas.style = "border: 1px solid black";
var keys = {};
var score = 0;
var livesLeft = 10;
window.addEventListener('keydown', function (e) {
keys[e.keyCode] = true;
e.preventDefault();
});
window.addEventListener('keyup', function (e) {
delete keys[e.keyCode];
});
function Box(options) {
this.x = options.x || 10;
this.y = options.y || 10;
this.width = options.width || 40;
this.height = options.height || 50;
this.color = options.color || '#000000'
this.speed = options.speed || 5;
this.direction = options.direction || 'right';
this.collideWith = function(otherobject) {
var myleft = this.x;
var myright = this.x + (this.width);
var mytop = this.y;
var mybottom = this.y + (this.height);
var otherleft = otherobject.x;
var otherright = otherobject.x + (otherobject.width);
var othertop = otherobject.y;
var otherbottom = otherobject.y + (otherobject.height);
var collision = true;
if ((mybottom <= othertop) ||
(mytop >= otherbottom) ||
(myright <= otherleft) ||
(myleft >= otherright)) {
collision = false;
}
return collision;
}
}
var player = new Box({
x: 10,
y: 10,
width: 50,
height: 50,
color: '#44ee11',
speed: 5
});
var food = new Box({
x: Math.floor(Math.random() * (canvas.width - 25)),
y: Math.floor(Math.random() * (350)),
width: 25,
height: 25,
color: '#ee3344'
});
function input(player) {
if (37 in keys) {
if (player.x - player.speed > 0) {
player.x -= player.speed;
}
player.direction = 'left';
}
if (39 in keys) {
if (player.x + player.width + player.speed < canvas.width) {
player.x += player.speed;
}
player.direction = 'right';
}
if (38 in keys) {
if (player.y - player.speed > 0) {
player.y -= player.speed;
}
player.direction = 'up';
}
if (40 in keys) {
if (player.y + player.height + player.speed < canvas.height) {
player.y += player.speed;
}
player.direction = 'down';
}
}
function drawBox(box) {
ctx.fillStyle = box.color;
ctx.fillRect(box.x, box.y, box.width, box.height);
}
function update() {
input(player);
}
function updateScoreBoard() {
ctx.font = "24px Arial";
ctx.fillStyle = "rgb(255,0,255)";
var str = "Score = " + score + " - Lives Left = " + livesLeft;
ctx.fillText(str, 50, 380);
}

function draw() {
if (player.collideWith(food)) {
score += 1;
livesLeft -=1;
ctx.clearRect(0, 0, canvas.width, canvas.height);
drawBox(player);
food.x = Math.floor(Math.random() * (canvas.width - 25));
food.y = Math.floor(Math.random() * (350));
drawBox(food);
updateScoreBoard();
} else {
ctx.clearRect(0, 0, canvas.width, canvas.height);
drawBox(player);
drawBox(food);
updateScoreBoard();
}
}
function loop() {
update();
draw();
window.requestAnimationFrame(loop);
}
loop();
Make sure that the game5.js and skeleton2.html files are both saved in the same location/folder.
Canvas Basics – Bouncing And Deflecting
This post will show you how to change the direction of an object when it collides either with other objects or the sides of the canvas.
This will also be the last post before demonstrating these code snippets in a game of Pong.
We will add an object to our canvas area, and for now we will call it “enemy”.
Then we will automatically move our ‘food’ object.
The collision detection will be amended to change the direction the food moves when it collides with the other objects or borders of the canvas.
Instructions
- Delete line 6 from the game5.js file if you have it in it. This deletes the line starting with “canvas.style = “.

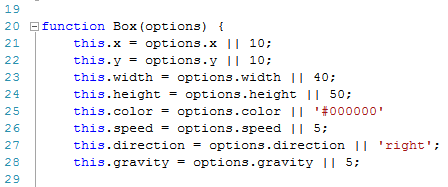
Add a gravity option to the Box function
- LINE 28 – this.gravity = options.gravity || 5; the default is set as 5. This option will be used for moving the food object up and down the screen. The speed option will be used for moving the food object left and right.
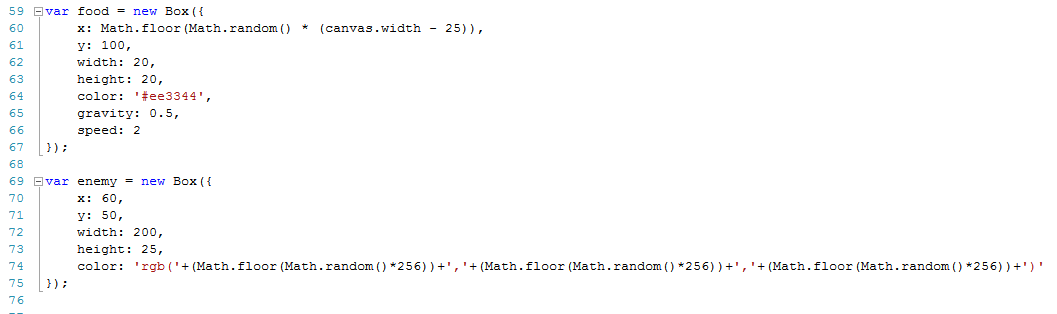
We will add speed and gravity values to the food object. This will allow us to change code later to have the food object move on it’s own and the player will control a paddle.
- LINE 65 – gravity: 0.5, the gravity value will refer to how fast the object moves up or down. A positive number will move down and a negative number will move up.
- LINE 66 – speed: 2 the speed value will refer to how fast the object moves left and right. A positive number will move right and a negative number will move left.

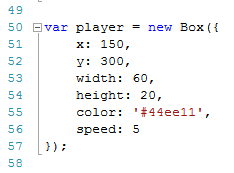
We are going to change the player object to make it flatter and wider, so it is more paddle-shaped. We will also move it closer to the bottom of the canvas.
- LINE 51 – x: 150,
- LINE 52 – y: 300,
- LINE 53 – width: 60,
- LINE 54 – height: 20,
- LINE 56 – speed: 5
Just below where we created the food object, we will create a new Box object called “enemy”.
This new object will be a relatively flat paddle near the top of the screen and to show you some more code, I’ll add a random color to it. Every time you load the page the color of this object will be randomly picked.
- LINE 69 – var enemy = new Box({ our new Box object is called enemy
- LINE 70 – x: 60, the X position of this object will be 60
- LINE 71 – y: 100, the Y position of this object will be 100
- LINE 72 – width: 200, the object will be 200 wide.
- LINE 73 – height: 25, the height will be 25
- LINE 74 – color: ‘rgb(‘ + (Math.floor(Math.random()*256+’,’+(Math.floor(Math.random()*256+’,’+(Math.floor(Math.random()*256+’)’ we are going to set the random color using rgb (Red Green Blue) values. RGB range from zero to 255 for each color. We are using the Math.floor(Math.random()*256) to randomly pick a number between 0 and 255. Because we are using math.floor, which rounds down to the nearest integer, we can use the number 256. If 255.9999 is the random number picked, when rounded down, this gives us 255. We set the random number for each number and then add a comma, pick the next number and repeat so 3 random numbers are picked and separated by commas and then a closing bracket finishes the line.
- LINE 75 – }); this ends the creation of our enemy object.
- We are going to change the input function for our player. We want to limit the movement to left and right, so delete the code for up and down arrow keys.

To recalculate the x and y values of the food object, i have created a new object after the drawBox function. This function is called gravityBounce.
- LINE 97 – function gravityBounce(){ create a function called gravity bounce
- LINE 98 – food.y += food.gravity; the food’s y position will change by the value of the gravity variable. This will be either up or down.
- LINE 99 – food.x += food.speed; the food’s x position will change by the value of the speed variable and this will be either left or right.
- LINE 100 – } this ends our gravityBounce function.

- Amend the updateScoreBoard function to just show the score.
- LINE 109 – var str = “Score = ” + score;

We will create a new function called checkBounce. This will check if our food object hits the top or sides of the canvas and changes the direction. It also checks if the food object falls below a certain point and it stops it moving.
- LINE 113 – function checkBounce() { this creates the checkBounce function
- LINE 114 – if ((food.x<=0) || (food.x >= canvas.width – food.width)) { this is saying if the food hits the left side (0) or the right side (canvas width – food width) then do whatever is contained between the curly brackets.
- LINE 115 – food.speed = food.speed * -1; if the food object hits the left or right side of the canvas, then change the direction on the X axis by multiplying the speed variable by -1. So, if it was a positive number (moving right) then it will be changed to a negative number (moving left).
- LINE 116 – } this ends the instructions for what to do if food hits the left or right sides of the canvas.
- LINE 117 – if (food.y <=0) { this is checking the food’s Y value against the top of the canvas. If food hits the top, the instructions between the curly brackets must be followed.
- LINE 118 – food.gravity = food.gravity * -1; as we did in line 115, we are changing the positive/negative value of the gravity variable if the food object hits the top of the screen. This will essentially change the food direction to down.
- LINE 119 – } this ends the instructions for what to do when the food object hits the top of the canvas.
- LINE 120 – if (food.y > player.y – food.height+10) { this is testing if the food has fallen below the player object. I have added in “+10” to allow for a bit more flexibility. If food falls below the player then the instructions to follow are contained in the curly brackets.
- LINE 121 – food.x = 200; reset the x position of food to be 200.
- LINE 122 – food.y = 200; reset the y position of food to be 200.
- LINE 123 – food.gravity = 0; changing the gravity value to zero stops the food object from moving up or down.
- LINE 214 – food.speed= 0; changing the speed value to zero stops the food object from moving left or right.
- LINE 125 – } this ends the instructions to be followed if the food object falls below the player.
- LINE 126 – draw(); after going through the above checks, then we will call the draw function. Previously, our loop function called the draw function which checked for collisions. We are going to change the loop function to call checkBounce and then this function will call the draw function.
- LINE 127 – } this ends the checkBounce function.

This is how our draw function looks at the minute:

We are going to add a collision check between the food object and the enemy object that we created earlier.
We will also make some changes to other lines to allow for bouncing and deflecting.
The final draw function will look like this:
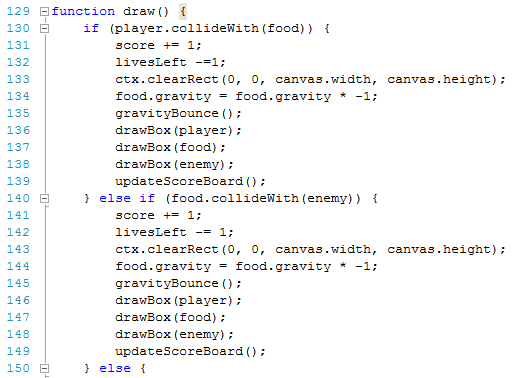

- LINE 134 – food.gravity = food.gravity *-1; if the food object and player object collide, we will change the gravity value of food, this will make the food object bounce back up.
- LINE 135 – gravityBounce(); this calls the gravityBounce function where we are updating the X and Y values of the food object.
- LINE 136 – drawBox(player); draw the player object
- LINE 137 – drawBox(food); draw the food object
- LINE 138 – drawBox(enemy); draw the enemy object
- LINE 140 – } else if (food.collideWith(enemy)) { instead of leaving this line as an ‘else’ statement after checking for player and food collision, we are going to add another check for collision between food and enemy
- LINE 141 – 149 these lines are the same as the instructions for where there is a collision between food and the player.
- LINE 150 – } else { if the food object has not collided with either the player or enemy objects, then the instructions contained between { } should be followed.
- LINE 151 – ctx.clearRect(0, 0, canvas.width, canvas.height); clear the canvas area
- LINE 152 – gravityBounce(); update the X and Y values of the food object by calling the gravityBounce function
- LINE 153 – drawBox(player); redraw the player object
- LINE 154 – drawBox(food); redraw the food object
- LINE 155 – drawBox(enemy); redraw the enemy object
- LINE 156 – updateScoreBoard(); call the updateScoreBoard function to display the scores.
- LINE 157 – } this ends the else statement
- LINE 158 – } this ends the draw function
The last thing to do will be to amend the loop function.
Instead of having the loop function call the draw function, we will have it call the checkBounce function.

- LINE 162 – checkBounce(); call the checkBounce function
Review
This is a good point to leave this post, the next post will be an example of a Pong (tennis) game.
The collision detection as it stands is quite basic and you may see some flaws with it. If the food object hits the side of player or enemy, it may get stuck in the player or enemy object for a few seconds.
A more advanced collision detection will fix this issue, but this basic detection will do for now.
We will look at other ways to work out collision detection in later posts.
The code you have at the minute should look like this:
var canvas = document.getElementById('canvas');
var ctx = canvas.getContext('2d');
canvas.width = 500;
canvas.height = 400;
var keys = {};
var score = 0;
var livesLeft = 10;
window.addEventListener('keydown', function (e) {
keys[e.keyCode] = true;
e.preventDefault();
});
window.addEventListener('keyup', function (e) {
delete keys[e.keyCode];
});
function Box(options) {
this.x = options.x || 10;
this.y = options.y || 10;
this.width = options.width || 40;
this.height = options.height || 50;
this.color = options.color || '#000000'
this.speed = options.speed || 5;
this.direction = options.direction || 'right';
this.gravity = options.gravity || 5;
this.collideWith = function(otherobject) {
var myleft = this.x;
var myright = this.x + (this.width);
var mytop = this.y;
var mybottom = this.y + (this.height);
var otherleft = otherobject.x;
var otherright = otherobject.x + (otherobject.width);
var othertop = otherobject.y;
var otherbottom = otherobject.y + (otherobject.height);
var collision = true;
if ((mybottom <= othertop) ||
(mytop >= otherbottom) ||
(myright <= otherleft) ||
(myleft >= otherright)) {
collision = false;
}
return collision;
}
}
var player = new Box({
x: 150,
y: 300,
width: 60,
height: 20,
color: '#44ee11',
speed: 5
});
var food = new Box({
x: Math.floor(Math.random() * (canvas.width - 25)),
y: 100,
width: 20,
height: 20,
color: '#ee3344',
gravity: 0.5,
speed: 2
});
var enemy = new Box({
x: 60,
y: 50,
width: 200,
height: 25,
color: 'rgb('+(Math.floor(Math.random()*256))+','+(Math.floor(Math.random()*256))+','+(Math.floor(Math.random()*256))+')'
});
function input(player) {
if (37 in keys) {
if (player.x - player.speed > 0) {
player.x -= player.speed;
}
player.direction = 'left';
}
if (39 in keys) {
if (player.x + player.width + player.speed < canvas.width) {
player.x += player.speed;
}
player.direction = 'right';
}
}
function drawBox(box) {
ctx.fillStyle = box.color;
ctx.fillRect(box.x, box.y, box.width, box.height);
}
function gravityBounce() {
food.y += food.gravity;
food.x += food.speed;
}
function update() {
input(player);
}
function updateScoreBoard() {
ctx.font = "24px Arial";
ctx.fillStyle = "rgb(255,0,255)";
var str = "Score = " + score;
ctx.fillText(str, 50, 380);
}
function checkBounce() {
if ((food.x <=0) || (food.x >= canvas.width - food.width)){
food.speed = food.speed * -1;
}
if (food.y <= 0){
food.gravity = food.gravity *-1;
}
if (food.y > player.y- food.height+10){
food.x = 200;
food.y = 200;
food.gravity = 0;
food.speed = 0;
}
draw();
}
function draw() {
if (player.collideWith(food)) {
score += 1;
livesLeft -=1;
ctx.clearRect(0, 0, canvas.width, canvas.height);
food.gravity = food.gravity * -1;
gravityBounce();
drawBox(player);
drawBox(food);
drawBox(enemy);
updateScoreBoard();
} else if (food.collideWith(enemy)) {
score += 1;
livesLeft -= 1;
ctx.clearRect(0, 0, canvas.width, canvas.height);
food.gravity = food.gravity * -1;
gravityBounce();
drawBox(player);
drawBox(food);
drawBox(enemy);
updateScoreBoard();
} else {
ctx.clearRect(0, 0, canvas.width, canvas.height);
gravityBounce();
drawBox(player);
drawBox(food);
drawBox(enemy);
updateScoreBoard();
}
}
function loop() {
update();
checkBounce();
window.requestAnimationFrame(loop);
}
loop();
An overview of what this code is doing is:
- we create 3 objects, player, food and enemy
- we add left and right arrow key instructions to the player object
- the loop function is the first function called (the last line of the code above)
- this function calls the update function which updates the position of the player object based on keyboard input. We also call the checkBounce function which checks if the food object should be bounced off the walls or top
- the checkBounce function above then calls the draw function.
- the draw function checks for collision between the food object and the player and enemy objects and it also calls the gravityBounce function. It then redraws the objects based on their new positions.
- the gravityBounce function updates the X and Y values of the player object based on the speed and gravity values.
- there is also a function to update the scoreboard.
In the next post we will put a lot of what we have seen so far together to create a tennis or Pong game.
Disclaimer
I am not claiming that the code that I use in these examples is the best, most efficient and up to date code.
Code gets updated and improved over time, what is best practice today may not be tomorrow.