Data Validation List In Excel Introduction

In the next few posts we will look at Data Validation Lists in Excel. You may have seen these and called them drop-down lists. We will start with the most basic form of a small Data Validation List and then get more advanced.
For this post, we will create a Data Validation List based on a small list of options.

If you have only a few options to be included in your list, this may be an option.
However, if your list is relatively long then you may want to base your options on a list – this will be covered in the next post.
It should be noted at this point, that this series of posts relates to the List type of Data validation rules, there are several other types, but they are outside the scope of these posts.
Data Validation List – Short List
- Select the cells that you want to apply the Data Validation List to. in my example cells A2 to A11.

- On the “Data” ribbon, select “Data Validation” from the “Data Validation” options.

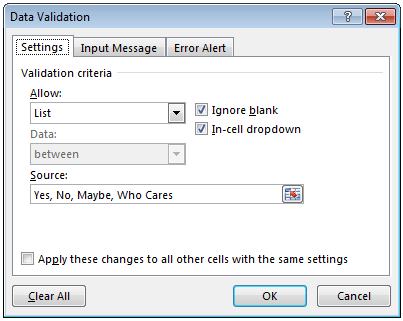
- Make the following changes:
- Allow: Select “List” from the menu
- Source: Type your options, separated by a comma
- Click “OK”
Congratulations!!
You have created a Data Validation List in Excel.
The Next List
In the next post, we will look at creating a Data Validation List, this time instead of typing in the options, you will base the list on a range of cells.
In the image below, the list of options is based on the cell range C2 to C7.

