Excel VBA Macros : Recording Your First Macro
This post will give you more of an introduction to Excel VBA Macros and you will be recording your first macro.
After recording the macro, we will then look at the code generated and start breaking it down, this will be the start of your adventures coding macros!!
The Story So Far…..
The following 2 posts give you a brief introduction up to this point. The second post includes details of how to see your Visual Basic Editor (VBE) and also to set up the Developer tab in your ribbon/menu. You should read these (or at least the second one) before continuing.
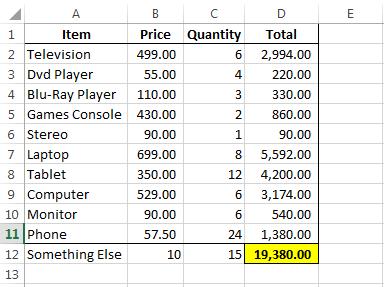
In the last post (number 2 above) we had a report of electrical items sold and we were manually formatting the file so it is in a required layout. The images below are of the original report and the final formatted report.


There were 16 steps involved in formatting the report and they were:
- Change the header in column A to say “Item”
- Change the header in column B to say “Price”
- Change the header in column C to say “Quantity”
- Add in a fourth column with the header “Total”
- For each item, in column D, multiply the quantity by the price
- Change the number format of column B to give 2 decimal places and use commas for thousand separator
- Change the number format of column D to give 2 decimal places and use commas for thousand separator
- Make the headers in row 1 bold
- Center the headers in row 1
- Widen the columns
- Add a border around the table
- At the bottom of column D, add in a total of all the totals
- Make this total bold
- Put a border around this total
- Change the fill color for the total to yellow
- Add a border around the headers in row 1
You can either recreate a table like the first image above, or try downloading from this link : Macros_Example1
Save the file, if you are saving it in Excel 2007 and later, you may need to save it as a Macro-Enabled Workbook. This gives it the file extension “.xlsm”.
Copy the first sheet, keep this as the original and we will work on the copied sheets.
We are now ready to start….
Recording Your First Macro
At the bottom of your Excel window, below the sheet name you may see a Record Macro button.
In Excel 2013, it looks like the image beside the word “Ready” below.![]()
In other versions of Excel this may be a similar button, or a red dot. In older versions of Excel, you may have to find the Macros option in the menus (from memory I belive it is on the “View” menu, under Macros there is a record macro option.
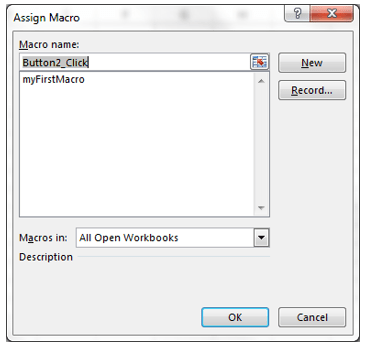
When you are ready to start, click the Record button and you will get a dialog box similar to this

I will name the macro “myFirstMacro” do no use spaces or certain punctuation, I keep the macro names simple and unique.
Leave the other options as they are, we will look at these in the future.
Once you click “OK” Excel will start recording your actions until you click the stop recording button (This has replaced the start recording button that you used already).
Go through the 16 steps above and stop recording the macro.
Your end result should look like this
Congratulations!
You have just created your first macro.
Run Your First Macro
Now that you have created a macro called “myFirstMacro” I’m sure you’re eager to see it in action.
Copy your original unformatted sheet 2 more times. We will run our macro on each sheet a different way. These are not the only 2 ways to run macros, but they are a good start.
Keyboard Shortcuts
On one of the new copied sheets, press Alt and F8 together. This brings up the following dialog box

This lists all available macros to be run. In our case we have only one, you can either press the “Run” button or hit the return key on your keyboard. With a quick flick of your screen you should end up with your formatted report.
Button
The last example you ran the macro by using keyboard shortcuts. Another way to run Excel VBA macros is to insert a button that will run the macro.
- Go to the Developer tab
- Click the drop down arrow below “Insert”
- Select the button from the “Form Controls” section (first option)
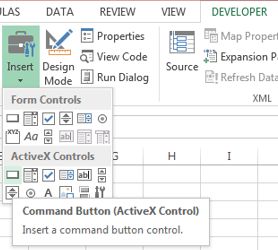
- with your mouse ‘draw’ the button on your worksheet (click and drag mouse to get height & width of button)

- You should get an “Assign Macro” dialog box, from here you can select the macro that this button will run. If you don’t get this automatically, you can right-click on your button and select “Assign Macro”
Now if you click your button, the macro runs and with a quick screen flicker you end up with the desired end result.
The Next Step…
The next post will look at the VBA code behind this macro. I will break it down for you and we will walk through each step to see what is happening with it.
If you want to jump ahead, you can look at the code yourself by going to your VBE (Alt +F11), you will find your macro in Module 1 of the project window.
Until the next post, I recommend trying the challenge, either comment below or private mail me with your answers.
Challenge
Here is a challenge for you…..
There is a reason why Excel VBA Macros, and other VBA Macros for that matter, do not act the way we expect.
Copy your original sheet one more time.
Now though, insert another row at the bottom.
- In Cell A12 type “Something Else”
- In Cell B12 type 10
- In Cell C12 type 15

- Now run the macro (you can use the keyboard shortcut, or insert a button)
- You should end up with this
The challenge for you is to tell me what happened here? What went wrong?
Good luck with the challenge… the answer to the question is easy, but if you understand the answer then you will already be well on your way to understanding the process of coding.
Until next time!!
