Excel VBA : Message Boxes & User Inputs

Message Boxes are easy to create and can be both informative and impressive to your program’s users. They appear as pop-up dialog boxes to your users and can give an update, information, warning, options, or other data.

Similar to Message Boxes, are input boxes which allows the users to enter something to a dialog box, this could be their name for example which you could then use throughout your program (if it was a game, at the end of each level you could create a message box that says “Congratulations John” if the player entered John as their name in the input box).
We will work through message boxes to user input boxes starting from the most basic to more useful.
You can make these as simple or as complicated as you like, obviously I would advise to keep it simple!
Message Boxes – MsgBox
Before continuing, you should make sure you are familiar with how to create buttons and assign macros to them. This earlier post will help you with this, scroll down to the Button section.
MsgBox #1 – vbOKOnly
The most basic message box we create will tell the user that they clicked a button!
We will create a macro called “messageDemoOne” and the code to have a message box appear with the message “Congratulations, you clicked a button” and an “OK” button is
- Sub messageDemoOne()
- MsgBox “Congratulations, you clicked a button”, vbOKOnly
- End Sub
Try this yourself,
- Create the macro
- Add a button to a sheet
- Asslign the messageDemoOne macro to the button
- Click the button
- Sit back with a smug, proud expression

MsgBox #2 – vbCritical
Let’s create a second macro, this time we will call it messageDemoTwo.
In the last example we used a “OK” button on our message box. This time we will create a message box that looks like a warning. The code will be MsgBox “Stop looking so smug” vbCritical
The full macro will be
- Sub messageDemoTwo()
- MsgBox “Stop looking so smug”, vbCritical
- End Sub
Create the macro and a second button. Assign this macro to the second button and run it.

MsgBox #3 – vbYesNo
Now that you have been brought back to earth, let’s give our users a choice.
Instead of just “OK” we will give the users the option to click Yes or No.
messageDemoThree will be our next macro and we will ask the question “Would you like to go to Sheet2?” and if the user clicks Yes, then we go to Sheet 2, or else we stay put and just go to cell A1 of the current sheet.. It might be worth mentioning here that you should ensure you have a “Sheet2” in your file!
The macro for this will be
- Sub messageDemoThree()
- If MsgBox (“Would you like to go to Sheet 2?”, vbYesNo) = vbYes Then
- Sheets(“Sheet2”).Select
- Range(“A1”).Select
- Else
- Range(“A1”).Select
- End If
- End Sub
Add another button, assign this macro to it and test it yourself.

Other MsgBox
There are a lot more message box types that you can use. After you enter your message and a comma in the code, a prompt will list the types of boxes you can have.
Feel free to play around with them yourself and experiment.
Input Boxes – InputBox
Input boxes can be used to receive input from users and then use that input in your program. An example could be to enter your name and the program will store that name as a variable so it can retrieve it whenever needed.
As your boxes and prompts get more complicated, you may end up combining strings with variable values. This post covers basics of using & in formulas and you should probably take a couple of minutes to read it.
For now, let’s make a very basic input box.
InputBox #1 – Basic Input Box
Our macro will be called inputDemoOne and it will have a variable called userName. This variable will be a String.
The userName will be based on what is entered in the input box.
- Sub inputDemoOne()
- Dim userName As String
- userName = InputBox(Prompt:=”What is your name?”, Title:=”Enter your name in this box”, Default:=”Enter name here”)
- End Sub
There are more parameters that you can change for the box (when you write the code a help tip shows the parameters).

The parameters I have changed are:
- Prompt – This is the question above the text field where the user enters data
- Title – This is the header above the prompt field
- Default – This is the value in the text field before the user enters anything – it could be left blank if you wanted.
Create your own input box and change the parameters.
Add another button to your sheet and assign this macro to it.
InputBox #2 – InputBox & MsgBox
So, we have entered a username into an input box, how do we know that Excel accepted it?
We will add a message box to a macro to repeat the name back to us.
- Sub inputDemoTwo()
- Dim userName As String
- userName = InputBox(Prompt:=”What is your name?”, Title:=”Enter your name in this box”, Default:=”Enter name here”)
- MsgBox (“The users name is ” & userName, vbOKOnly)
- End Sub
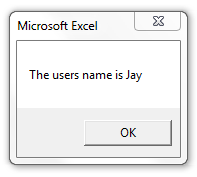
When I enter my name (Jay) it returns “The users name is Jay” in a message box.
Note when writing the prompt for the message box that the text I want to specify is between double apostrophes and the variable value is not – This is an important thing to note. Later you will see we have specific text, then variable value, then more text and the same thing applies to these.
InputBox #3 – InputBox, Calculation & MsgBox
This next macro (inputDemoThree) will take user input, perform a calculation and return results of the calculation through a message box.
This will involve 3 variables, all of type Double (beforeVat, vatValue, inclVat). The user input will become the value of beforeVAT. vatValue will be 23% of this (multiply by 0.23) and inclVat will be the sum of beforeVat and vatValue.
The message box will then give the details of each variable value.
- Sub inputDemoThree()
- Dim beforeVat As Double
- Dim vatValue As Double
- Dim inclVat As Double
- beforeVat = InputBox(Prompt:=”What is the value before VAT?”, Title:=”VAT Calculator”)
- vatValue = beforeVat * 0.23
- inclVat = beforeVat + vatValue
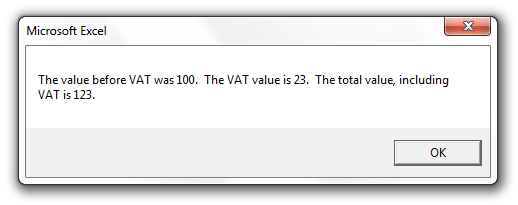
- MsgBox (“The value before VAT was ” & beforeVat & “. The VAT value is ” & vatValue & “. The total value including VAT is ” & inclVat)
- End Sub
100 is an easy number to use to demonstrate this macro (1oo is value before VAT, 23 is the VAT value and 123 is the value including VAT).

Note the importance of the double apostrophes in the prompt!!
Whatever text I want to specify (including full stops) must be between double apostrophes and the variable values are not. The & is used to join everything together to make one string.
InputBox # 4 – vbNewLine
Our last message box was looking a bit long & unimpressive. Let’s redo it, but this time we will add vbNewLine which moves the following text to a new line within the message box.
Copy inputDemoThree and change the name to inputDemoFour. Note the changes I have made to the MsgBox line to add a new line after each full stop.
- Sub inputDemoThree()
- Dim beforeVat As Double
- Dim vatValue As Double
- Dim inclVat As Double
- beforeVat = InputBox(Prompt:=”What is the value before VAT?”, Title:=”VAT Calculator”)
- vatValue = beforeVat * 0.23
- inclVat = beforeVat + vatValue
- MsgBox (“The value before VAT was ” & beforeVat & “.” & vbNewLine & “The VAT value is ” & vatValue & “.” & vbNewLine & “The total value including VAT is ” & inclVat)
- End Sub
Note that where I use vbNewLine, this is like pressing Enter or the Return key in a Word document, and starts a new line. The & must be used to incorporate vbNewLine in the string.

