Canvas Basics – 05 Limiting Movement To Canvas

This is the fifth post in this series looking at the <canvas> element in HTML5.
Each post will give a new element of snippet of code that can be put together to create your own games.
So far we have displayed text on screen, looked at the mouse’s X and Y co-ordinates on the canvas, moved a shape automatically and moved a shape using the keyboard’s arrow keys.
In the last post we noted that we could move our shape off screen because there was no limit put on the shapes movement. Now we will talk about limiting movement to the canvas area.
This is a follow on from the posts looking at maths in games (click here to read the first post).
If you are not already familiar with HTML, you can read through the posts starting here (click to read).
The first 4 posts in this series can be found at:
- Canvas Basics – 01 Hello World
- Canvas Basics – 02 Mouse Detection
- Canvas Basics – 03 Moving An Object
- Canvas Basics – 04 Move An Object Using The Keyboard
You can start reading the above links if you have no HTML/Javascript/Canvas experience, or if you have some of the basics covered already, you can continue with this post.
This post is going to show you how to limit the movement of our object to the canvas area.
What you’ll need
For these posts you will need a text editor (Notepad on Windows for example) and a relatively up to date browser (Google Chrome is my preference).
In the screenshots you are about to see, you will see that I am not using Notepad for coding, this is because I am using a different package which allows you to see line numbers, this will make it easier for me to comment on particular lines.
Skeleton
If you are following these posts, you should have a skeleton2.html file from the last post.
We are going to make 2 changes to this, if you have not been following these posts, copy the code below to a text editor file and save it as “skeleton2.html”.

From the last post, change the following 2 pieces of code:
- LINE 3 – Change the title of your page if you want to, this is not necessary
- LINE 6 – Change the source of the script to be “game2.js”. We are going to save our original game1.js file as game2.js and change that. You will still have game1.js from the last post if you ever wanted to refer back to it.
The final code for skeleton is:
<!DOCTYPE html>
<head>
<title>Limit Movement To Canvas Area</title>
</head>
<body>
<canvas id="canvas">
Your browser doesn't support Canvas, try another or update
</canvas>
<script src="game2.js"></script>
</body>
</html>
Save this file.
Going forward, you are going to view the “skeleton2.html” file in your browser, but all the code we are about to create will be entered in the game2.js file in your text editor.
game2.js
In your text editor, open game1.js and save it as game2.js.
If you have not been following these posts, copy the final code from game1.js below into a blank text editor file and save as game2.js.
var canvas = document.getElementById('canvas');
var ctx = canvas.getContext('2d');
canvas.width = window.innerWidth;
canvas.height = window.innerHeight;
var keys = {};
window.addEventListener('keydown', function (e) {
keys[e.keyCode] = true;
e.preventDefault();
});
window.addEventListener('keyup', function (e) {
delete keys[e.keyCode];
});
function Box(options) {
this.x = options.x || 10;
this.y = options.y || 10;
this.width = options.width || 40;
this.height = options.height || 50;
this.color = options.color || '#000000'
this.speed = options.speed || 5;
this.direction = options.direction || 'right';
}
var player = new Box({
X: 10,
y: 10,
width: 50,
height: 50,
color: '#44ee11',
speed: 5
});
function input(player) {
if (37 in keys) {
player.x -= player.speed;
player.direction = 'left';
}
if (39 in keys) {
player.x += player.speed;
player.direction = 'right';
}
if (38 in keys) {
player.y -= player.speed;
player.direction = 'up';
}
if (40 in keys) {
player.y += player.speed;
player.direction = 'down';
}
}
function drawBox(box) {
ctx.fillStyle = box.color;
ctx.fillRect(box.x, box.y, box.width, box.height);
}
function update() {
input(player);
}
function draw() {
ctx.clearRect(0, 0, canvas.width, canvas.height);
drawBox(player);
}

function loop() {
update();
draw();
window.requestAnimationFrame(loop);
}
loop();
Make sure that the game2.js and skeleton2.html files are both saved in the same location/folder.
Canvas Basics – Limiting Movement To The Canvas Area
This post will make a few changes to the .js file you have already created.
In the file you have at the minute, it draws a rectangle on screen and moves it around based on arrow keys the user presses.
Up to now, there were no limits on the movement of the rectangle, it could be moved off screen.
We are now going to limit that movement to just the canvas area so if the box is at the leftmost side of the canvas, pressing the left key will have no effect, the rectangle will be prevented from moving.
Let’s Begin
Open the game2.js file in your text editor.
Find the input function (starting at line 37).
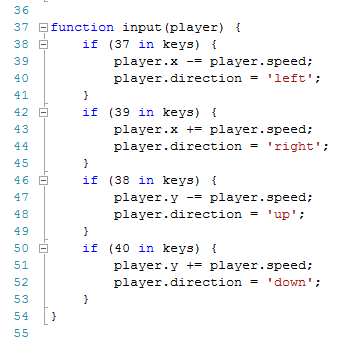
This is the function that changes the X and Y positions of the player object, based on keys pressed.
At the minute, the X and Y positions change and the rest of the code on this file redraws the player in its new position.
We are going to put a condition on these movements, if the player is already at the leftmost side of the canvas then we do not want them moving any further left, if they are already at the top then we do not want them to continue moving up.
The first key in our input function is the left arrow key, so we will start with changing this code first as it is one of the simpler ones to change.
Limit Left Movement
Let’s look at the code for the left key as it currently stands.
 if (37 in keys) {
player.x -= player.speed;
player.direction = 'left';
}
At the minute we are saying if the left key is pressed, then reduce the player’s X position – this effectively means move it left on the X axis.
We are now going to put a condition on this.
We want to say if the player’s current X position minus the player.speed variable is greater than zero (the leftmost side of the canvas) then it is OK to reduce the X position.
Without actually spelling it out in code, this means if the player is already at zero on the X axis and the left key is pressed, nothing happens.
If the player is not at zero and the left key is pressed, then the player’s X position will be reduced and the object on screen will move left.
 if (37 in keys) {
if (player.x - player.speed > 0) {
player.x -= player.speed;
}
player.direction = 'left';
}
The player.x -= player.speed; line stays the same, it is now contained within the curly brackets { } of an if test.
The if test is checking to ensure the future player.x position (current position minus player.speed variable) is still going to be greater than zero.
If it is, then go ahead and change the X position.
We will set up the other 3 arrow key inputs in a similar way for now and you will see that two of them will need to be tweaked.
For now, save your text file and update your browser, now try moving left off screen, you shouldn’t be able to.
Limit Right Movement
The code for the right key as it is, is similar to how the code for the left key was, except we are adding to the player’s X position to move it right.
if (39 in keys) {
player.x += player.speed;
player.direction = 'right';
}
If we copy the changes we made for the left key and apply to the right key (replacing the minus symbol with a plus symbol in the if statement) we get:
if (39 in keys) {
if (player.x + player.speed < canvas.width) {
player.x += player.speed;
}
Save your text file and move your player to the right.

You should see that your box moves off screen to the right and is only slightly visible on screen before it stops moving right.
This is because the player’s X and Y positions relate to the top right corner of the shape.
In our code when we say only move the player if the X position will be less than the canvas width, this is interpreted as only moving the player if the X value of the left hand side of the player will be less than the canvas width.
To stop the box moving so far off screen, we need to amend the code to allow for the full width of the box and not just the left-hand side edge.
We do this by adding the width of player to player.x and player.speed in our if statement.
if (39 in keys) {
if (player.x + player.width + player.speed < canvas.width) {
player.x += player.speed;
}
player.direction = 'right';
}
Save your text file and refresh your browser, you should not be able to move the box off screen to the left or right.
NOTE If the code isn’t working for you so far and the box isn’t moving all the way to the right, check your zoom. If you have zoomed out alot the canvas area will not be your full screen area.
If you have zoomed in too much, there will be scroll bars, use these to scroll to the edge of the canvas and you should see then that the code is working.
Next we will work on limiting our movement within the top and bottom boundaries of our canvas.
Limit Up Movement
Can you create the code to limit the up movement?
It will be relatively similar to the code for the left key.
As it was, the code for the up arrow was
if (38 in keys) {
player.y -= player.speed;
player.direction = 'up';
}
We will add in another if statement to the above.
This time we are checking if the player.y position minus the player.speed value is greater than zero, then update the Y value and move the player.
if (38 in keys) {
if (player.y - player.speed > 0) {
player.y -= player.speed;
}
player.direction = 'up';
}
Like the left key, this is the simpler key to update because the Y position is based on the top of the box.
When it comes to moving down we will have to allow for the height of the box.
Limit Down Movement
As we did with the code for the right key, we will amend the code as it was (below)
if (40 in keys) {
player.y += player.speed;
player.direction = 'down';
}
We will add an if statement checking if the player.y plus player.speed is less than the height of the canvas.
if (40 in keys) {
if (player.y + player.speed < canvas.height) {
player.y += player.speed;
}
player.direction = 'down';
}
Save your text file and refresh your browser.
Move the box down to the bottom and you should just about see the top of the box visible before it stops moving down.

As with the right key, we need to allow for the height of the player box when limiting the movement down because the player.y relates to the top of the box.
if (40 in keys) {
if (player.y + player.height + player.speed < canvas.height) {
player.y += player.speed;
}
player.direction = 'down';
}
Save your text file as it is now and refresh your browser.
You should not be able to move the player off screen using the arrow keys now.
Review
So far in these posts we have displayed text, read the x and y values of the mouse, moved a shape automatically and moved a shape using the arrow keys, and now we have limited the movement of that shape to the confines of the canvas.
You can also limit movement using defined co-ordinates. Instead of using canvas width or height, change these to numbers like 4oo for example. Save the text file and refresh the browser and see the differences.
The game2.js code that we have finished with should look like this
var canvas = document.getElementById('canvas');
var ctx = canvas.getContext('2d');
canvas.width = window.innerWidth;
canvas.height = window.innerHeight;
var keys = {};
window.addEventListener('keydown', function (e) {
keys[e.keyCode] = true;
e.preventDefault();
});
window.addEventListener('keyup', function (e) {
delete keys[e.keyCode];
});
function Box(options) {
this.x = options.x || 10;
this.y = options.y || 10;
this.width = options.width || 40;
this.height = options.height || 50;
this.color = options.color || '#000000'
this.speed = options.speed || 5;
this.direction = options.direction || 'right';
}
var player = new Box({
X: 10,
y: 10,
width: 50,
height: 50,
color: '#44ee11',
speed: 5
});
function input(player) {
if (37 in keys) {
if (player.x - player.speed > 0) {
player.x -= player.speed;
}
player.direction = 'left';
}
if (39 in keys) {
if (player.x + player.width + player.speed < canvas.width) {
player.x += player.speed;
}
player.direction = 'right';
}
if (38 in keys) {
if (player.y - player.speed > 0) {
player.y -= player.speed;
}
player.direction = 'up';
}
if (40 in keys) {
if (player.y + player.height + player.speed < canvas.height) {
player.y += player.speed;
}
player.direction = 'down';
}
}
function drawBox(box) {
ctx.fillStyle = box.color;
ctx.fillRect(box.x, box.y, box.width, box.height);
}
function update() {
input(player);
}
function draw() {
ctx.clearRect(0, 0, canvas.width, canvas.height);
drawBox(player);
}

function loop() {
update();
draw();
window.requestAnimationFrame(loop);
}
loop();
We are getting a lot closer to piecing together some games.
Next we will look at collision detection. If your player is moved into the same spot as another object do you want to stop the player moving (if the object is a wall for example), want the new object to disappear (if it is hit with a bullet for example or if it was a coin collected by the player).
We will also look at random numbers, a game could be very boring if the enemies/food/coins appeared in the same spot every time.
We will set the game to randomly place other objects – you may remember this from games like Snake, where the food appears in a random spot and every time you collect food the next piece appears in another random spot.
Disclaimer
I am not claiming that the code that I use in these examples is the best, most efficient and up to date code.
Code gets updated and improved over time, what is best practice today may not be tomorrow.