Custom Sort
So, you can sort from A-Z, Z-A, smallest to largest number and so on, but can you create your own custom sort?
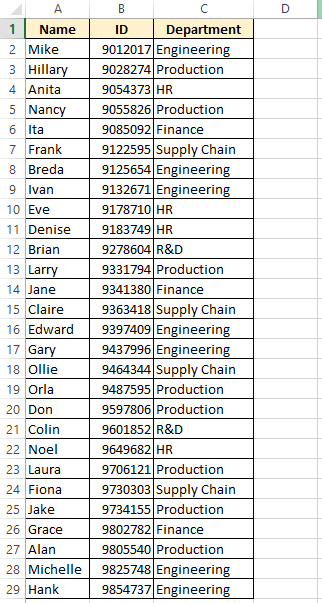
Let’s base our custom sort on this data:

Before going onto the custom sort, let’s very quickly look at “normal” sorting.
If you are comfortable with the normal sorting, you can skip the next 2 sections.
Sort Alphabetically
- Go to the DATA ribbon
- Click on “Sort”

- Sort by – select the column that you want to sort the data by. I am going to sort by the Name column.
- Order – This column is made up of alpha/letters, so we can sort it alphabetically. I am going to sort in descending order, from Z to A.
- My data has headers – This check-box is important. If you have it selected, the top row of the selected data will be treated as a header and not included in the sort. In my case, if this was not checked, the header “Name” would be included in the sort and end up between Nancy and Mike.
- Add/Delete Level – If you wanted to sort first by Department and then by Name within the departments, you would add levels to your sort. If you already had multiple levels in your sort and you want to change it to one level, then you delete levels.
The results of the above Sort are:

Sort Numerically
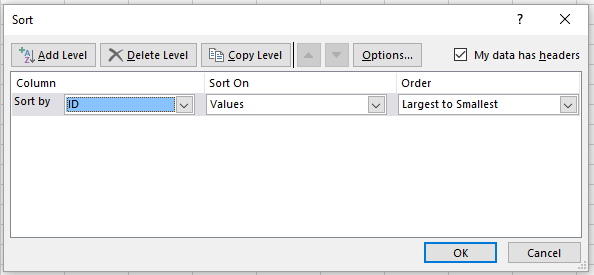
This time we will sort by employee ID number.
When we select ID as the column to sort by, Excel sees that the data in this column is numeric and gives us slightly different sort options.
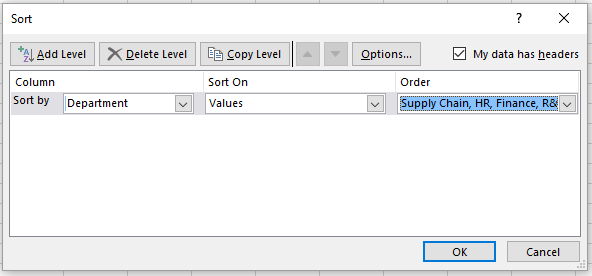
Custom Sort
Now we will apply a custom sort, and sort our data in order of Department.
But rather than sorting departments in alphabetical order, we will apply a custom sort to list people in Supply Chain, then HR, then Finance, then R&D and then Engineering.
- Click on “Sort” as normal
- Select the column to sort by
- Select “Custom List…” from the Order option

- This then gives you a “Custom Lists” box
- Enter the order you want to sort by
- After each entry, press Enter or Return so separate the list
- Click the “Add” button
- Click “OK”

- Note the Order option has changed
- Click “OK”
- Excel will sort the data in your custom sort order
- Any data not included in you custom sort entries, will be sorted by Excel by default

Now you should be able to easily add more levels to your sort options and take more control over the order that your data is displayed.
