Excel VBA Macros : Variables
In VBA Macros, Variables are used to temporarily store information. This piece of information can be retrieved by your code and used or changed and then reused. In a lot of cases, using variables instead of setting values can make your code snippets and macros more reusable across files.
For example, in a quiz you could have a variable that stores the payer’s score, it starts as zero and if they answer question one correctly it the code will add 1 to the score, so the program retrieves the variable (0) and adds 1, the new score variable is now 1. The next time the person answers a question the program will retrieve the variable (1) and add 1, the new value is 2 and so on.
You could have a variable that holds a person’s name, every time the program uses the name it retrieves the variable which holds the name and uses it, this is better than changing the code every time a different name is used, especially if the name is used several times within the code. All you have to do is change the variable once.
Here, we will use a variable to find the last row of a file and then add a total field – this can be reused if we have 10 rows or 100,000 rows of data, Excel will find the bottom row and add a total field. As you may have seen from this post, setting a total row using cell references won’t work because the number of rows of data can change, so the location of the total field will need to change too.
As you get more and more involved with macros, you will find that most of the time there are more ways to do the same things. I will cover how I do them, there may be quicker ways or you may have your own preferences, the important thing is that you understand the code and that it works.
Declare, Define, & Display Variables
Variable Types
There are several data types that you can assign your variable as. The ones I use most often are:
- Integer – holds whole numbers between -32,768 and 32,767.
- String – can include letters, numbers and punctuation.
- Long – holds numbers between -2,147,483,648 up to 2,147,483,647
Variable Names
You set the name of your variables to whatever you want. There are some rules around this though:
- The name must start with a letter. They can contain numbers, but must begin with letters
- The name must contain no spaces. Personally I use capital first letters between words(eg myVariableName) but underscores can be used if you prefer (my_variable_name)
- The name can’t be longer than 250 characters
- The name cannot be on of Excel’s keywords like Worksheet. If in doubt, personally I use my initials first so this would be jtWorksheet.
To make your code easier to read, give the variable a name that makes sense.
Below we are going to create a variable that gives the bottom row of the table. We will call this variable “lastRow”. This is easier to understand when we read back through code than if we called it “someVariable” for example.
Declaring A Variable
We must declare a variable before we can do anything else with it. To do this, we use the word “Dim”, then the variable name and we set the variable type using “As”.
For our macro we are going to declare a Long varialbe and call it “lastRow”.
I declare all my variables at the start of my macros, after creating it (Sub….)
Dim lastRow As Long
We have now created a variable called lastRow and set is to contain Long data types.
Continuing Our Macro…
If you have been following the posts so far, you will have created a file that now looks like this
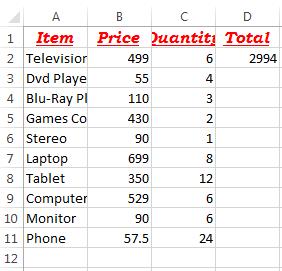
You can work through the posts so far or download this file and continue from there : Macros_Example_D
Declaring a Variable
Open the VBE by pressing Alt and F11 together and look in the Module 1 folder if it is not already open.
In the first line after creating our Macro I have defined the lastRow variable.

So far we have created a variable, the next thing to do is assign a value to that variable.
Assigning A Value To The Variable
We are going to find the bottom row of our table and assign that row number as our variable.
To find our bottom row, we will use the code snippets covered in the Ctrl And Arrow Keys post.
We will use cell A1 as our starting point and jump to the bottom of the table
- Range(“A1”).Select
- lastRow = Selection.End(xlDown).Row
In our example, the lastRow variable will hold “11”. If we added 10 more rows and then updated the variable value again, it would hold “21”.
This is where variable can make your code so reusable, no matter how many rows of data there is, the variable will store the value of the bottom row.
Using The Variable
There is a formula in cell D2 multiplying the quantity by price. If we were to record a macro dragging this formula down (autofilling) the macro would record the autofill from D2 to D11. But the next time we run this macro, if there were 30 rows of data, the macro would still only autofill from D2 to D11.
Instead, we will autofill from D2 down to the lastRow variable. Then, no matter how many rows we have, the autofill will go to the bottom row.
We will enter this code at the bottom of our macro, just before the End Sub
Code Snippet
- Range(“A1”).Select
- lastRow = Selection.End(xlDown).Row
- Range(“D2”).Select
- Selection.AutoFill Destination: = Range((“D2:D”). & lastRow)
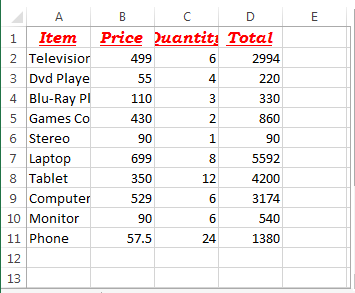
Copy your raw data from Sheet1 to another sheet and run the macro (Alt+F8) on the copied sheet. You should get this:
A Second Variable
Let’s create a second variable, this variable will contain the row number below our last row and will be where we enter our total formula.
We will call this variable lastRowTotal and it will be of data type Long.
Define this variable just below your last variable
- Dim lastRowTotal As Long
There are a few ways to assign a value to this variable. You can go to the lastRow and offset by one row or you can add one to the lastRow value.
We will add 1 to lastRow in our case
- lastRowTotal = lastRow + 1
We want to set the value of cell Dx to say =SUM(D2:Dy) where x is the lastRowTotal where we want to enter our formula and y is the lastRow of our table.
Code Snippet
- Range((“D”) & lastRowTotal) = “=SUM(D2:D” & lastRow & “)”
Copy sheet 1 of your file to another sheet and run the macro again. You should get this
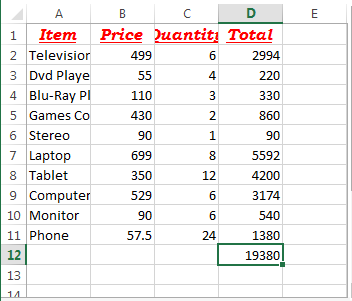
Because of the variables, no matter how many rows of data there is, lastRow will find the bottom row of your table and lastRowTotal will be one row below this.
This is just one of many ways that variables can be used to improve your macros and make them more flexible and reusable.
Create your own variables, add more rows to the file and run the code again, play around with variables and practice using them.
What’s Next?…
Next time we will add borders to our file and use variables so that they change to match our tables. We will also add comments to our macro.
After that we will deal with
- Message boxes and prompts
- User Inputs
- Working with other files
- Speeding things up by turning off autocalc & screen refresh
- Debugging
[grwebform url=”http://app.getresponse.com/view_webform.js?wid=2766903&u=CucD” css=”on”/]
