Excel Option Buttons
It’s been a while since I posted about Excel macros, so I think it’s time I touched on this subject again. In this post we will add Option Buttons to a sheet and have that sheet change based on the selected option.
With Option Buttons, only one option can be selected at a time.
If you select option A and then B, B will be marked as selected and A will be deselected.
This is different to Check Boxes where you can select several options at the same time.
Option Buttons Demonstration
To demonstrate Option Buttons, we’ll use an example of a template for requesting changes to a customer database.
There will be 3 options:
- Add a new customer
- Edit an existing customer
- Delete a customer
The fields to be completed for a new customer will include
- Customer name
- Address 1
- Address 2
- City
- State
- Email Address
To edit a customer we will want the user to enter the customer number and then edit the relevant fields.
To delete a customer we will want the user to enter the customer number and a reason for deletion.
File Set-Up
When I start to work on any template or form like this, I try to minimize the coding needed.
On one sheet I like to map out how I want my file to look and if possible keep the formatting the same where I can. This means I can format the cell once and not have to worry or think about formatting it using code.
I have added lines to the cells between A1 and F17 so that you can see clearer the formatting I have done, do not add these borders in your file:
- Merged A1 to E1
- Set font size as 14, red and bold
- Entered the text “Customer Database Maintenance”
- Merged A3 to E3
- Set font as bold
- Entered the text “What type of change would you like to make?”
- Changed the row height of rows 4 to 7 to be 18 (to allow space for Option Buttons)
- Set font in A8 as bold – I have entered the word “Question” purely to show you it is bold, in my actual file I don’t have this word here
- Merged A9 to B9, repeat for A10 to B10 and repeat again down to row 15
- Merge C9 to D9 and again repeat down to row 15
When saving the file, you will need to save it in a format that allows VBA Macros, for example with the .xlsm file extension.
Add Option Buttons
Now that we have the basic file set up, we are ready to add Option Buttons.
You need to have the Developer tab in your Ribbon before you continue.
If you don’t have this already you can read http://blog.thejaytray.com/excel-vba-macros/.
In your Developer tab you should have an Insert button.
Click on this and then the ActiveX Controls Option Buttons button, in the image below it is the 2nd button on the last row.
Hover your mouse over the button in your file to get the description. Depending on the version of Excel you are using, you may see something slightly different.
Click around cell B4 and ‘draw’ your button and text.
Repeat below this for 2 more buttons, don’t worry about being exact, we are going to correct the look and layout of the buttons soon.
Congratulations, you have just added 3 Option Buttons!!
Admittedly they don’t do much or look particularly impressive on screen at the minute, but we’re about to change that.
Option Buttons Properties
We are now going to resize and re-position our Option Buttons by changing each button’s properties.
To start, ensure you are in Design Mode.
On the Developer ribbon, is the Design Mode button selected?
You can turn Design Mode on and off by clicking this button, we want to be in Design Mode now.
Right-click on the first Option Button and select Properties.
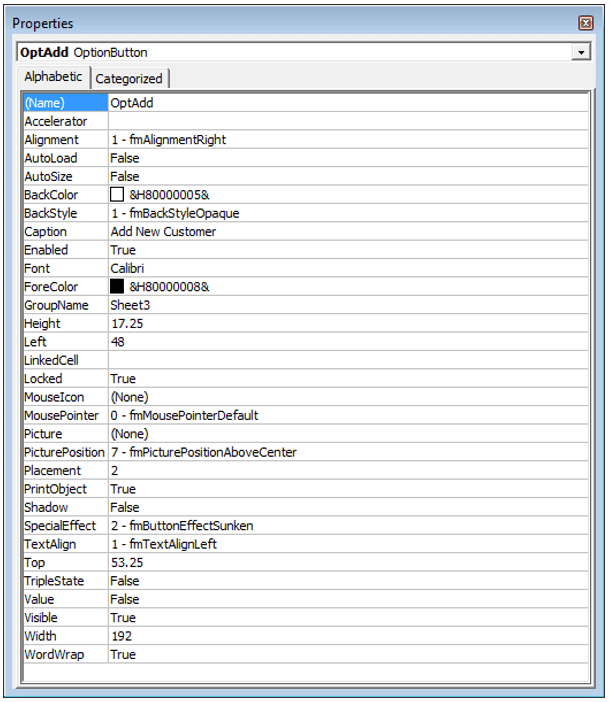
Change the following properties:
- (Name)=OptAdd – This is how you will refer to this Option Button in your code. For all these buttons, boxes and fields I rename them to include a shortened version of what type of button/box and also a short name that is meaningful. Here “OptAdd” is short to me for Option Button Add. You don’t have to rename the buttons, but as files get bigger I usually find this as an easy way to follow code and understand what is happening.
- Caption=Add New Customer – this is the text that will appear beside the Option Button
- Height=17.25
- Left = 48
- Top=53.25
- Width=192 – The height and width properties are obvious. The left and top properties relate to the position of the Option Buttons, play around with these to place the button where you want it.
Repeat for the next two buttons, but with the following properties:
Option Button 2
- (Name)=OptEdit
- Caption=Edit Existing Customer
- Height=17.25
- Left = 48
- Top=70.5
- Width=192
Option Button 3
- (Name)=OptDelete
- Caption=Delete Existing Customer
- Height=17.25
- Left = 48
- Top=87.5
- Width=192
Apply a white fill to the sheet and you should have a file that is starting to look usable.
Next we will add some code.
Option Buttons Coding
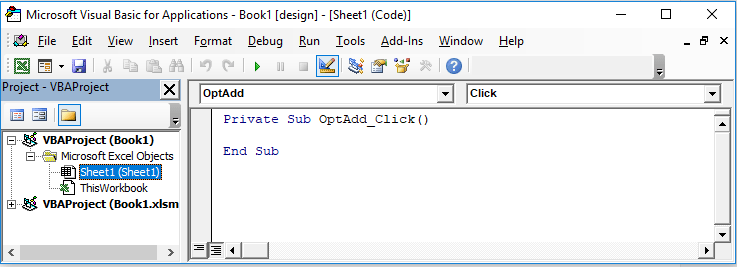
While in Design Mode, either double-click or right-click the first Option Button and select View Code for the first button.
This will bring up the VBA editor.
You are ready to start a macro for what happens with the OptAdd button is clicked on.
You will add your code between the “Private Sub OptAdd_Click()” and “End Sub” lines. For the remaining two buttons, you will also be adding code in between the “Prive Sub…” and “End Sub” lines for each Option Button.
Note: This post won’t go into detail on coding, it is expected that you know at least the basics, or if you don’t read back through my earlier posts on the topic.
We are going to enter an IF statement that says if OptAdd is selected then we want to see the question and fields for adding a new vendor.
I am going to number the lines of code below, this is just so that I can give a brief explanation of the code at the end.
If OptAdd.Value = True Then
Range("A8:D14").Select
Selection.Borders(xlEdgeBottom).LineStyle = xlNone
Selection.Borders(xlInsideHorizontal).LineStyle = xlNone
Selection.ClearContents
Range("A8").Value = "Please enter customer details"
Range("A9").Value = "Customer Name"
Range("A10").Value = "Address 1"
Range("A11").Value = "Address 2"
Range("A12").Value = "City"
Range("A13").Value = "State"
Range("A14").Value = "Email Address"
Range("C9:D14").Select
With Selection.Borders(xlEdgeBottom)
   .LineStyle = xlContinuous
   .ColorIndex=0
   .TintAndShade=0
   .Weight = xlThin
End With
With Selection.Borders(xlInsideHorizontal)
   .LineStyle = xlContinuous
   .ColorIndex=0
   .TintAndShade=0
   .Weight = xlThin
End With
End If
This is a brief explanation of what is happening in the code:
- Line 1 checks if the OptAdd Option Button is selected, then complete the rest of this code
- Lines 2 to 5 remove any borders or content from the range A8 to D14 that may have already been there. We are going to add this to all the buttons as a way to ‘clean’ A8 to D14 each time a new option is selected.
- Line 6 enters the instruction to enter customer details
- Lines 7 to 12 enter the field names to be completed
- Lines 13 to 25 put a border at the bottom of each row in the range
- Line 26 ends the if statement that we started at the top.
Go back to your Excel sheet and do the same for the second button.
A lot of the code from the first button can be copied and pasted for the second button and the amended.
The code for the second button will be
If OptEdit.Value = True Then
Range("A8:D14").Select
Selection.Borders(xlEdgeBottom).LineStyle = xlNone
Selection.Borders(xlInsideHorizontal).LineStyle = xlNone
Selection.ClearContents
Dim editNumber As String
editNumber = InputBox(Prompt:="What is the customer number to be edited?", Title:="Edit Customer", Default:="Enter Number Here")
Range("A8").Value = "What changes do you want to make to Customer " & editNumber
Range("A9").Value = "Customer Name"
Range("A10").Value = "Address 1"
Range("A11").Value = "Address 2"
Range("A12").Value = "City"
Range("A13").Value = "State"
Range("A14").Value = "Email Address"
Range("C9:D14").Select
With Selection.Borders(xlEdgeBottom)
   .LineStyle = xlContinuous
   .ColorIndex=0
   .TintAndShade=0
   .Weight = xlThin
End With
With Selection.Borders(xlInsideHorizontal)
   .LineStyle = xlContinuous
   .ColorIndex=0
   .TintAndShade=0
   .Weight = xlThin
End With
End If
This is a brief explanation of what is happening in the code:
- Line 1 checks if the OptEdit Option Button is selected this time, then complete the rest of this code
- Lines 2 to 5 remove any borders or content from the range A8 to E14 that may have already been there. We are going to add this to all the buttons as a way to ‘clean’ A8 to E14 each time a new option is selected.
- Line 6 is different here, this time we create a variable called editNumber. This will store the customer number that is to be edited.
- Lines 7 creates a user input box that asks the user to enter the customer number that is to be edited. The default value will be “Enter Number Here”
- Line 8 asks the user what changes they want to make to the customer number that they entered in the input box.
- Lines 9 to 14 label the fields that can be edited
- Lines 15 to 27 put a border at the bottom of each row in the range
- Line 28 ends the if statement that we started at the top.
If you want to read more on the user input box you can read http://blog.thejaytray.com/excel-vba-message-boxes-user-inputs/.
For the final button and final piece of coding, go back to your Excel sheet and do the same for the third button.
This time you could copy the code from the second button because a lot of it will be reused and edit it as follow
If OptDelete.Value = True Then
Range("A8:D14").Select
Selection.Borders(xlEdgeBottom).LineStyle = xlNone
Selection.Borders(xlInsideHorizontal).LineStyle = xlNone
Selection.ClearContents
Dim deleteNumber As String
deleteNumber = InputBox(Prompt:="What is the customer number to be deleted?", Title:="Delete Customer", Default:="Enter Number Here")
Range("A8").Value = "Please give reason for deleting Customer " & deleteNumber
Range("A9:D14").Select
With Selection.Borders(xlEdgeBottom)
   .LineStyle = xlContinuous
   .ColorIndex=0
   .TintAndShade=0
   .Weight = xlThin
End With
With Selection.Borders(xlInsideHorizontal)
   .LineStyle = xlContinuous
   .ColorIndex=0
   .TintAndShade=0
   .Weight = xlThin
End With
End If
This is a brief explanation of what is happening in the code:
- Line 1 checks if the Optdelete Option Button is selected this time, then complete the rest of this code
- Lines 2 to 5 remove any borders or content from the range A8 to D14 that may have already been there. We are going to add this to all the buttons as a way to ‘clean’ A8 to D14 each time a new option is selected.
- Line 6 is different here, this time we create a variable called deleteNumber. This will store the customer number that is to be deleted.
- Lines 7 creates a user input box that asks the user to enter the customer number that is to be deleted.
- Line 8 asks the user for a reason for deleting the customer.
- Lines 9 to 21 apply the borders from A9 to D14. This time we are not showing fields to be edited, just leaving lines.
- Line 22 ends the if statement that we started at the top.
You can close the VBA editor and go back to your Excel sheet now.
Testing Your Option Buttons
Make sure you are not in Design Mode.
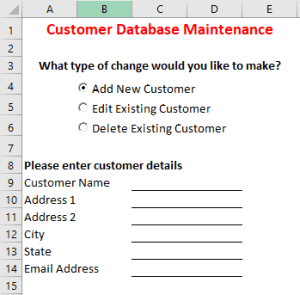
Click on the first Option Button – to add a customer and you should see something like this
Now click on the second Option Button to edit a customer.
You should get a pop-up box asking for a customer number, enter 123456 for demonstration.
When you click on the third option – to delete a customer, for demonstration enter the customer number 98765
Now click back on any buttons already clicked and the form sheet should update.
Try Option Buttons Yourself
Try the Option Buttons yourself now.
Change the properties, apply different rules around options, etc.
Why not have one Option Button create another question with several Option Buttons and continue that way?
One thing I would advise when trying different levels of Option Buttons would be to know what you want the finished file to look at before you put your hands to the keyboard.
Map it our on paper if you want, it is very easy to get bogged down in code and option and after option and miss something that may cause a problem later.
In later posts I will cover other Active X controls, including how to create a form, but for now try out the Option Buttons and coding for yourself.


