HTML Back To Basics
As you look at websites, do you ever wonder about how it was made?
Did it cost thousands to create?
Was it made by a 45 year old virgin living in his mother’s basement?
These thoughts are not entirely true.
You can write your own website for free. It is true that there are some templates out there that you can use to create your website easily in minutes, and they do work.
The problem I have with them though is that you are restricted to the template layout and design (possibly with some options to change elements). To make the template look exactly how you want it to look, and act the way you want it to act, you may need to know a certain amount of code to change the template.
The website has been built using one of these templates and for the most part it worked, but I have to use code to make some changes from time to time.
Your Free Website
Over the coming weeks we will put together a website for free!.
So… let’s begin!
We will build the site and as we go along I will tell you what is happening.
I won’t be going into too much detail, there are plenty of sites out there full of detail in this area.
My goal is to get you up and running and give you an understanding of what is going on and how to change or create sites yourself.
Software Needed
For demonstration purposes I will be using a text editor called “Komodo Edit” which is free to download.
Normally though, I would just use the free text editor “Notepad” which is free with Windows and can usually be found under All Programs>Accessories. Apple and other Operating Systems should have an equivalent text editor.
Note that I use Notepad and not Microsoft Word as a text editor.
The reason I’m using Komodo Edit now is because it shows line numbers and this will be easier for me to describe changes to be made, etc. as we go through the blog posts.
You will also need a web browser to view your pages. My browser of choice is Google’s Chrome.
Prep
Before we start coding, we need to set up our folders so we have a bit of structure from the offset.
- Create a folder on your desktop called “WEBSITE”.
- Within this folder create a folder called “CSS”
- Also, within the WEBSITE folder, create a second folder called “Images”
We will save all our webpages to the parent “WEBSITE” folder and the supporting files will be saved in the CSS and Images folders.
Our First Web Page
In your text editor open a new file and save it to your WEBSITE folder and call it “index.html” (all lowercase and no spaces).
Type the following code

When you type it, you may not have the different colored font and line numbers – this is a feature of Komodo Edit. So don’t worry if you don’t have the same thing.
The code is what is important, make sure to use the right brackets, slashes and upper/lowercase.
Save the file.
Go to your WEBSITE folder and open the index.html file in your browser and you should see something like this…

So, what did we just type?
<!DOCTYPE HTML>
This tells your browser that you created a HTML5 page.
There are other types of pages, but at time of publication, HTML5 is the current format. It is so current that it is actually still being standardised.
Have you noticed that some web pages look or act differently if you open them in different browsers (Chrome, Firefox, Safari, Explorer, etc.)? That is because the different browsers treated some of the code differently.
Web designers could end up coding the same thing more than once to suit the different browsers. Hopefully HTML5 will set more widely used standards, but some pages may not act the way you expect in older browsers. This is because they predate some of the new HTML5 code.
If unsure, the best thing to do is view your page in as many different browsers as you can.
<html>
Everything between the opening <html> tag and closing </html> tag is treated as HTML code.
I’ve added in lang = “en” along with the opening HTML tag to specify the language is english.
Note that most opening tags in HTML5 must also have a closing tag.
This is not always the case, there are exceptions that we will come across in the future.
Out of habit, I create the opening and closing tags at the same time and then type the code in between them. This removes the risk of forgetting to enter a closing tag.
<head>
Everything between the opening <head> and closing </head> tags make up the head or header area of the page.
This area will contain other useful parts later, but nothing here will appear in the body of the webpage.
We have also set <meta charset = “UTF-8”>. This tells the browser to use the english character set, which is not very obviously called UTF-8.
For now it is enough to know to use this code in the header.
<title>
The text between the opening and closing <title> tags make up the title of the page.
Browsers treat this item differently, in the case of Chrome, you can see that the description in the tab is “Our First Page”.
<body>
The <body> and </body> tags contain the body of your page, this is what appears on screen.
You may have noticed that I have indented some of my code. I do this occasionally to make the code look better and easier to read.
The opening and closing tags are more obvious.
Later when we get into lists, you will definitely see the benefit of indenting code.
<h1>
The <h1> and </h1> tags contain text that will be considered a level one heading (main heading).
h2 is heading level 2, h3 is heading level 3 and so on.
<p> and </p> would contain paragraph text.
The format of these will be changed later.
Make Changes
With both your text editor and web page open in your browser…
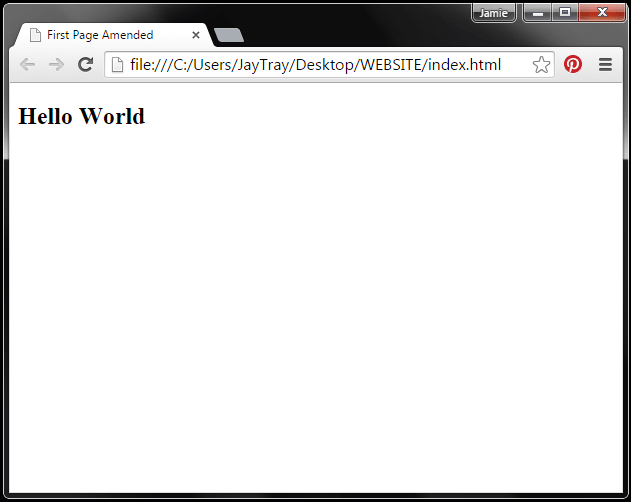
- In the text editor, change the <h1> and </h1> tags in line 9 to <h2> and </h2> and save the file
- In the browser, refresh the screen and watch the text format change
- In the text editor, change the title in line 5 to “First Page Amended” and save the file
- In the browser, refresh the screen and watch the title change

Next Week…
Next time we will create a page with different types of lists and text.
Until then….. have fun!!!
[grwebform url=”http://app.getresponse.com/view_webform.js?wid=4307503&u=CucD” css=”on”/]