Canvas Basics – 02 Mouse Detection

This is the second of a series of posts looking at the <canvas> element in HTML5.
I have been using the canvas element to create games and over the next few posts will look at some of the Canvas basics.
This is a follow on from the posts looking at maths in games (click here to read the first post).
If you are not already familiar with HTML, you can read through the posts starting here (click to read).
The first post in this series covered how to display “Hello World” (click to read) on screen, displaying text on screen is one of the fundamentals you want to understand before going to the next stage which is now detecting the mouse pointer on screen.
What you’ll need
For these posts you will need a text editor (Notepad on Windows for example) and a relatively up to date browser (Google Chrome is my preference).
In the screenshots you are about to see, you will see that I am not using Notepad for coding, this is because I am using a different package which allows you to see line numbers, this will make it easier for me to comment on particular lines.
Instructions
If you plan on following all steps in these posts, at this point I would advise setting up a folder to store all the files you will create.
Initially, all files will be saved as “.html” files which by default will open in a web browser.
You will be editing these files in your text editor (for example, right-click the .html file in your folder and choose to open with Notepad) and viewing them in your web browser.
After each step, you might have to save the text editor file and then refresh your web browser to view the changes.
During instructions, I might tell you to save the file and refresh the browser, I will be referring to the line above.
Skeleton
If you followed my last post, you should have a skeleton.html file that you are going to start with and build on.
If you don’t have this skeleton file, enter the following code in your text editor and save it as “skeleton.html”.

<!DOCTYPE html>
<head>
<title>This Is My File</title>
<meta name=”viewport” content=”width=device-width, user-scalable=no”>
<script type=”text/javascript”>
</script>
</head>
<body>
</body>
</html>
For future files, you can open this skeleton and save it as the name instructed and then amend it.
This will be like a template for the basic layout.
The script for Canvas will be entered from line 6 and the Canvas element itself will be entered from line 10,
Canvas Basics – Where’s My Mouse?
This post will detect your mouse movement and where the mouse is on the Canvas.
You will also display the position on the canvas and watch the position change as you move the mouse.
Why would you need to know where your mouse is?
If your game involved you clicking on a target or object, canvas needs to know where your mouse is and if it is in the same position as the object you are clicking on, then Canvas knows that you are clicking on or moving the mouse over the object.
Let’s Begin
Open your skeleton.html file and save it as “mouseposition.html” and then start making the following changes:
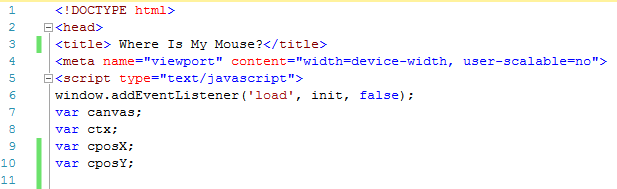
- Line 3 – Change the title of the page to “Where Is My Mouse?”
- Line 6 – window.addEventListener(‘load’, init, false); as with the last post, we are adding an event listener, when the page loads, then call the “init” function which you will see in later lines.
- Line 7 – var canvas; as with the last post, we are adding a variable pointing to the canvas
- Line 8 – var ctx; again, as with the last post, we are adding a variable that will be used later to define the 2d context
- Line 9 – var cposX; this variable will be the X position of our mouse on the canvas
- Line 10 – var cposY; this variable will be the Y position of our mouse on the canvas
Next we will add our init function.
This isn’t too unlike the init function in our last post, this time we are going to add an event listener, this time to detect mouse movement and when it detects mouse movement it will call the “mouseMove” function.
Add the following lines:
- Line 12 – function init(){ this starts our init function. The function ends with a closing curly bracket.
- Line 13 – canvas = document.getElementById(“canvas”); this finds the canvas tag later in the html file and sets the canvas variable to reference that tag
- Line 14 – ctx = canvas.getContext(“2d”); dthis sets the context variable to reference the 2d drawing context of the canvas
- Line 15 – canvas.addEventListener(“mousemove”, mouseMove, false); this event listener ‘listens’ for mouse movement on the canvas and when it detects movement, it calls the next function mouseMove
- Line 16 – } this is the closing bracket ending the init function.

Next, we enter the mouseMove function which will detect the mouse’s X and Y position in relation to the canvas.
It then calls the next function which will display the position on the canvas.
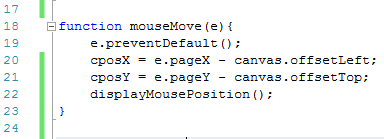
- Line 18 – function mouseMove(e){ this starts our mouseMove function which is called when the event listener detects movement. Again, it ends with a closing }
- Line 19 – e.preventDefault(); we are telling the browser that we will handle this event
- Line 20 – cposX = e.pageX – canvas.offsetLeft; we set up the cposX variable earlier. This gets the X position of our mouse on the canvas. It looks at the difference between the mouse position for this event and the left hand side of the canvas (which is zero)
- Line 21 – cposY = e.pageY – canvas.offsetTop; we set up the cposY variable earlier. This gets the Y position of our mouse on the canvas. It looks at the difference between the mouse position for this event and the top of the canvas (which is zero)
- Line 22 – displayMousePosition(); we now call the next function which is called displayMousePosition
- Line 23 – } this closing bracket ends the mouseMove function
Now that we know the position of the mouse, the next thing to do is display it on screen.
In the last post we displayed “Hello World” on screen, this is similar for the most part but with a couple of extra lines.
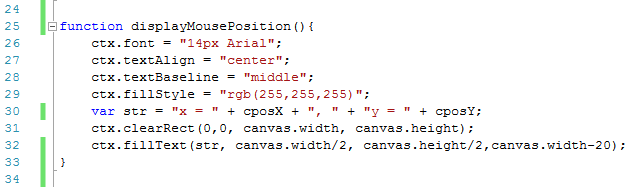
- Line 25 – function displayMousePosition(){ this starts our displayMousePosition function. You can probably guess by now that the function ends with a closing }.
- Lines 26 to 29 – these lines set the font type, alignment and color (fillStyle). Change the font size type and alignment and color, save your text file and refresh your browser to see the changes.
- Line 30 – var str = “x = ” + cposX + “, ” + “y = ” + cposY; we create a variable called str (short for string) which says that x is equal to and then the value of the cposX variable and that y is equal to the value of the cposY variable. Note that the results of the variables are not contained within quotes. The text contained within quotes will stay the same, but the variable results with changed. If for example cposX was contained within quotes, onscreen you would see the letters cposX and not the numeric value of the variable.
- Line 31 – ctx.clearRect(0,0,canvas.width,canvas.height); when moving objects or animating in canvas, this is an important thing to remember. This clears the whole canvas. If you don’t do this, when you move the mouse it will display the mouse position, when you move the mouse again it displays the new mouse position on top of the last mouse position and so on until after just a couple of moves you can’t read the x or y positions. Instead you want to display the position, clear the canvas and display the new position and so on.
- Line 32 – ctx.fillText(str, canvas.width/2, canvas.height/2, canvas.width-20); here we will populate the text with the result of our str variable from line 30. The X position of the text will be the middle which is the width of the canvas divided by 2. The Y position of the text again will be the middle, this time it is half the height of the canvas. To allow room at the side of our canvas, the maximum number width will be the canvas width minus 20
- Line 33 – } this is the closing bracket to end the displayMousePosition function
This ends the first part of our script.
Next we add the canvas to the body of the html page.
This code is the same as was used in the last post.
- Line 38 – <canvas id=”canvas” height=”200″ width=”300″ style=”background-color:green”> this is where we place our canvas on the html document. This tag is in the body of the page. You can change the height, width and background color of the canvas. Save the text file and refresh your browser to see the changes.
- Line 39 – This browser doesnt support canvas technology, try another or update a user will only see this message if their browser doesn’t support canvas technology.
- Line 40 – </canvas> this is the closing canvas tag.

This is how the finished code looks in a browser.

Review
If you have followed this post and viewed the final file in your browser, you should be able to move your mouse around over the green canvas area and see the x and y values update on the canvas.
Getting and displaying the position of the mouse is probably not something you will do very often, however getting and knowing the position of the mouse and displaying text on screen will be very useful things to know when it comes to putting a game together.
You will see these being used in a very basic game later, but first we need to add more objects to a game than just the mouse.
The final code is
<!DOCTYPE html>
<head>
<title> Where Is My Mouse?</title>
<meta name=”viewport” content=”width=device-width, user-scalable=no”>
<script type=”text/javascript”>
window.addEventListener(‘load’, init, false);
var canvas;
var ctx;
var cposX;
var cposY;
function init(){
canvas = document.getElementById(“canvas”);
ctx = canvas.getContext(“2d”);
canvas.addEventListener(“mousemove”, mouseMove, false);
}
function mouseMove(e){
e.preventDefault();
cposX = e.pageX – canvas.offsetLeft;
cposY = e.pageY – canvas.offsetTop;
displayMousePosition();
}
function displayMousePosition(){
ctx.font = “14px Arial”;
ctx.textAlign = “center”;
ctx.textBaseline = “middle”;
ctx.fillStyle = “rgb(255,255,255)”;
var str = “x = ” + cposX + “, ” + “y = ” + cposY;
ctx.clearRect(0,0, canvas.width, canvas.height);
ctx.fillText(str, canvas.width/2, canvas.height/2,canvas.width-20);
}
</script>
</head>
<body>
<canvas id=”canvas” height=”200″ width”300″ style=”background-color:green”>
This browser doesnt support canvas technology, try another or update
</canvas>
</body>
</html>
Try It Yourself
Recreate this file yourself and then change some of the variables like position, text, font size and type.
After making changes to the text editor, save it and then refresh your browser.
In the next post we will take it a step further and display a box that we will move around.
Disclaimer
I am not claiming that the code that I use in these examples is the best, most efficient and up to date code.
Code gets updated and improved over time, what is best practice today may not be tomorrow.