PowerPoint Animation Pane

So you’ve put together the content of your presentation and you are now ready to animate it.
This is where the PowerPoint animation pane comes into play. As well as making animation easier, faster and less painful to work with, the PowerPoint animation pane may also give you easier access to some options.
If you have been following my tips so far, you will have left the animation to the end and each of your bullet points will be in individual text boxes (click each link to read the full article).
For demonstration purposes, I have just created a new file with 6 bullet points, each in a text box.

The next thing to do is to view the animation pane.
From PowerPoint 2007 to 2013, you can see the option for the animation pane in the “Animation” ribbon towards the right.

Click on the first object to be animated and select the animation you want from the “Animation” options in the ribbon bar.
To keep it simple here, I will use “Fly In”.
I will click on each item to be animated and then select “Fly In” in the order they are to be animated.
The Animation Pane shows 6 animations, and my slide also has 6 numbers, 1 beside each bullet point.
Each number here corresponds with the number in the Animation Pane.

If you preview your presentation, you may notice that you have to tell PowerPoint when to move onto the next animation (this could be done with the space bar, return key, arrow down button, mouse button, a presentation clicker among other ways).
By default, the “Start” setting for animation is “On-Click”.
This means that the animation will start on click (where you tell PowerPoint to proceed) and then the next animation will start again when you click again.
There are two other Start settings, “With Previous” and “After Previous”.
We will look at each of these in turn.
With Previous
The animation pane lists the order of objects to be animated – if you select something to start with previous, then it will be animated at the same time as the previous item (the item listed above it in the animation pane).
In our example, I have left the first point to start On-Click and changed points 2 to 6 to start “with previous”
To do this, I clicked on the second point and while holding down shift, clicked on the 6th point.
This selected all points in between. Then from the menu available, I selected “With Previous”

Note our animation pane has only 1 number and in the presentation slide, “1” is beside all 6 points.
If you preview the presentation, when you click the first time all other animation happens with the first one.
After Previous
This time I have changed points 2 to 6 to start “After Previous”.
I did this in the same way I changed them to “With Previous” in the last example.
The animation pane has changed slightly, note that the green boxes are now staggered.

Now if you preview the presentation, after you click to display the first point, then the second point will animate, when that is finished then the third point will animate and so on.
The animation will happen automatically after the previous animation has completed.
Combining With & After Previous
You don’t have to have a slide set to use either On-Click, With Previous or After Previous, you can combine all 3.
In some presentations I may want to display a graph and text at the same time, after another animation has happened and the next point may be set to on-click.
I also combine animation start times to have something appear at the same time or immediately after another object has disappeared.
Other PowerPoint Animation Pane Tips
Changing Order
The PowerPoint Animation Pane can also be used to change the order of animations.
I have reset my example so all points are in order and set to start on-click.
By clicking and dragging any item in the animation pane, you can move animation order up or down to quickly change the order of them.
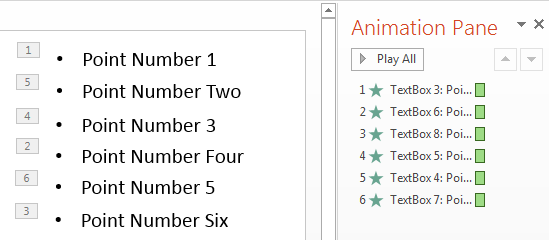
Note that the animation pane still lists animation in order from 1 to 6, but, if you look at the number on the slide itself, or the numbers of the textboxes in the animation pane, then you will see that the order has changed.
Speed, Timings & Delays
The menus in the PowerPoint animation pane also give you “Timings” options.

Here you can change the speed (duration) of the animation, the delay allows you to delay the start of the animation. You can play around with other options to see how you might use them, but start, delay and duration are probably the ones you will use most often.
Effects
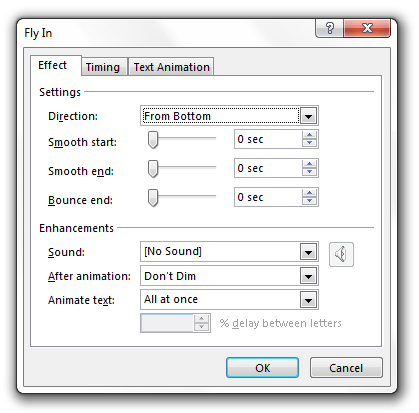
Depending on the animation selected you may see different effects options. For example some of the motion animations allow you to set the direction of the animation.
From here you can also add sound to animations and smooth settings.
Try It Yourself…
There are so many options available to you that one blog post won’t cover them, but here I have tried to cover the highlights and give you enough information to try it out for yourself.
So feel free to test different options, settings and animations.
But remember, you are not competing with Disney here, don’t allow animations to overshadow or replace good content!!
[grwebform url=”http://app.getresponse.com/view_webform.js?wid=4307503&u=CucD” css=”on”/]